To increase the number of stitches on your row, you could make a yarn over, but that leaves a hole. To increase almost invisibly, a make one, abreviated M1, is a good choice. Book between two stitches you should see that there is a line of yarn between these stitches.
Step One: Knit to the point where the increases is needed.
Step Two: Insert the right needle into the line of yarn between the two stitches.
Step Three: wrap the yarn over the needle.
Step Four: Pull the yarn through the line.
Step Five: Continue knitting the rest of the row.
Here is the video, it shows me knitting one, then doing a M1, then knitting one, then a M1...
Showing posts with label Tutorial. Show all posts
Showing posts with label Tutorial. Show all posts
Thursday, August 14, 2008


Thursday, August 7, 2008
Tutorial: Binding off - The K2Tog Bind-off
Binding off is a term used to describe the process of combining your stitches to finish off the project, or it can be used when some of the stitches on a row need to be finished and others don’t, like for a button hole.
Step One: Get to the point where you want to end your knitting.
Step Two: Hold your knitted item in your left hand and your empty needle in your right hand. Hold the yarn in back of the knitted item.
Step Three: Stick the empty needle into the back of the first two stitches on your other needle.
Step Four: Loop the yarn around the end of the empty needle.
Step Five: Pull the yarn that you just looped over the needle through the two stitches.
Step Six: Drop the two stitches off of the needle. Now the previously empty needle has one stitch on it and the other needle has two less stitches than it started with.
Step Seven: place the lone stitch on the previously empty needle back onto the other needle.
Step Eight: Repeat steps three through Seven.
Step Nine: When you only have one stitch left on your needles, pull the yarn, making the stitch larger, so that there will be enough yarn to either weave in the ends or sew it together with another piece.
Step Ten: snip the yarn, making sure you have enough yarn attached as mentioned in step nine.
Step Eleven: pull the yarn, this will fasten the end. Step Twelve: continue with the pattern, either weaving in the ends or sewing the piece together with the pieces it attaches to.
Here is the video:
Step One: Get to the point where you want to end your knitting.
Step Two: Hold your knitted item in your left hand and your empty needle in your right hand. Hold the yarn in back of the knitted item.
Step Three: Stick the empty needle into the back of the first two stitches on your other needle.
Step Four: Loop the yarn around the end of the empty needle.
Step Five: Pull the yarn that you just looped over the needle through the two stitches.
Step Six: Drop the two stitches off of the needle. Now the previously empty needle has one stitch on it and the other needle has two less stitches than it started with.
Step Seven: place the lone stitch on the previously empty needle back onto the other needle.
Step Eight: Repeat steps three through Seven.
Step Nine: When you only have one stitch left on your needles, pull the yarn, making the stitch larger, so that there will be enough yarn to either weave in the ends or sew it together with another piece.
Step Ten: snip the yarn, making sure you have enough yarn attached as mentioned in step nine.
Step Eleven: pull the yarn, this will fasten the end. Step Twelve: continue with the pattern, either weaving in the ends or sewing the piece together with the pieces it attaches to.
Here is the video:
Links to this tutorial and my other tutorials can be found on the left side of your screen.
Thank You and Have a Great Day!
Thursday, July 31, 2008
Tutorial: Decreasing: K2Tog
Decreases are used to shape knitting for things like sleeves. They can also be used with increases to make lace. Using them together keeps the number of stitches constant on each row.
Step 1: knit to the point where the decrease is desired.
Step 2: Stick the needle into the next two stitches.
Step 3: wrap the yarn around the needle you just stuck into the stitches.
Step 4: Pull the yarn through the two stitches.
Step 5: Drop the two stitches off of the needle.
Now you have one stitch where previously you had two. This same procedure can be used for the K3Tog. The P2Tog is the same, just hold the yarn in the front of the needles.
I decided to take the video off, because the lighting was terrible, and made it hard to see anything. I plan on redoing this video this weekend.
Step 1: knit to the point where the decrease is desired.
Step 2: Stick the needle into the next two stitches.
Step 3: wrap the yarn around the needle you just stuck into the stitches.
Step 4: Pull the yarn through the two stitches.
Step 5: Drop the two stitches off of the needle.
Now you have one stitch where previously you had two. This same procedure can be used for the K3Tog. The P2Tog is the same, just hold the yarn in the front of the needles.
I decided to take the video off, because the lighting was terrible, and made it hard to see anything. I plan on redoing this video this weekend.
Links for this tutorial and others can be found on the left side of the blog.
Thursday, July 24, 2008
Tutorial - The Eastern Cast on
When knitting things like socks from the toe up, this cast on method is very useful. I just learned how to do it and thought I'd share in case anyone else was having problems with it. As I said, this is new to me, so if you have a better way to do it, or any little tweeks to make to the way I'm doing it, feel free to chime in.
Step 1: Take two double pointed needles (DPNs) and hold them parallel to each other, with a little space between them. (Just in case you are wondering, the space should be about the size where you can fit your pinky finger through the middle of the two DPNs)
Step 2: Leaving a little bit of a tail, stick the yarn between the two DPNs. so that your tail is in front of the bottom needle and the yarn connected to the ball of yarn is behind the top needle. I've found that if you tie a slip knot when you are starting and put it on the bottom needle, it is easier to keep the needles parallel to each other.
Step 3: Wrap the yarn around the two needles half as many times as the number of stitches you need to cast on. Wrap the yarn over the top needle, under the bottom needle... When you get your desired amount of casted on stitches, take the yarn that is connected to the ball of yarn and put it in the back of the two needles.
Step 4: Starting with the stitches on the top needle, knit across.
Step 5: Knit the stitches on the bottom needle.
Now, you have cast on stitches and can proceed with your sock or whatever it is you are making.
Here is the video, I hope it clears up any questions you might have. But if it doesn't, feel free to leave a comment. Go ahead and mute the video, I completely forgot what the background "music" was and have gotten some comments that it is annoying. I listened to it again and am a little embarrassed that I actually pubished this. I think the video is good, but I havn't been able to take the time to change the background sound.
Check out some of my other popular posts:
The Swift and the Yarn Winder
Might as well face it, you're addicted to yarn.
Andean Folk Knits-A Book Review
Finished Object: The "Shaped Triangle" Shawl
Or check out the tutorials on the left margin of the blog.
Step 1: Take two double pointed needles (DPNs) and hold them parallel to each other, with a little space between them. (Just in case you are wondering, the space should be about the size where you can fit your pinky finger through the middle of the two DPNs)
Step 2: Leaving a little bit of a tail, stick the yarn between the two DPNs. so that your tail is in front of the bottom needle and the yarn connected to the ball of yarn is behind the top needle. I've found that if you tie a slip knot when you are starting and put it on the bottom needle, it is easier to keep the needles parallel to each other.
Step 3: Wrap the yarn around the two needles half as many times as the number of stitches you need to cast on. Wrap the yarn over the top needle, under the bottom needle... When you get your desired amount of casted on stitches, take the yarn that is connected to the ball of yarn and put it in the back of the two needles.
Step 4: Starting with the stitches on the top needle, knit across.
Step 5: Knit the stitches on the bottom needle.
Now, you have cast on stitches and can proceed with your sock or whatever it is you are making.
Here is the video, I hope it clears up any questions you might have. But if it doesn't, feel free to leave a comment. Go ahead and mute the video, I completely forgot what the background "music" was and have gotten some comments that it is annoying. I listened to it again and am a little embarrassed that I actually pubished this. I think the video is good, but I havn't been able to take the time to change the background sound.
Check out some of my other popular posts:
The Swift and the Yarn Winder
Might as well face it, you're addicted to yarn.
Andean Folk Knits-A Book Review
Finished Object: The "Shaped Triangle" Shawl
Or check out the tutorials on the left margin of the blog.
Thursday, July 10, 2008
Tutorial: The Yarn Over
Yarn Overs are used in knitting to increase the number of stitches and to make holes in the knitted fabric. Yarn overs are very useful in lace knitting.
Yarn overs are very easy. Like their name suggests, you just put the yarn over the needle. When I was first learning to knit, I was a little intimidated by them.
Step 1: Once you already have your knitting on the needles, knit to the desired point in your row and instead of sticking your needle into the next stitch, just wrap the yarn around the needle like you would when you are making a knit stitch.
Step 2: Knit the next stitch like you normally would.
Here is the Video, In it, I do a yarn over then a knit stitch, then another Yarn Over than another Knit Stitch.
Yarn overs are very easy. Like their name suggests, you just put the yarn over the needle. When I was first learning to knit, I was a little intimidated by them.
Step 1: Once you already have your knitting on the needles, knit to the desired point in your row and instead of sticking your needle into the next stitch, just wrap the yarn around the needle like you would when you are making a knit stitch.
Step 2: Knit the next stitch like you normally would.
Here is the Video, In it, I do a yarn over then a knit stitch, then another Yarn Over than another Knit Stitch.
Wednesday, July 2, 2008
The Purl Stitch
The next thing to learn in your journey to becoming a knitter is the purl stitch. The purl stitch is the one that looks like a bunch of bumps or --'s. Together, the knit stitch and the purl stitch yield unlimited possibilities. These two stitches can be combined to make many different patterns, garments, and accessories. It really amazes me just how much these two stitches can do when they get together. As a previous post stated, these directions are in the Eastern European Style.
Here is a step by step guide to the purl stitch. The video is below. As with the knit stitch, you'll need a cast on row or a row of knit and/or purls. When referring to the needle with all of the stitches already on it, I'll call it the populated needle and the other needle will be referred to as the empty needle.
Step 1. Hold the needles with your cast on/knitted/purled stitches from your previous row in your left hand. The empty needle on your right hand.
Step 2. Stick the empty needle through the front of the stitch closest to the pointy end of the populated needle.
Step 3. Wrap the yarn around the empty needle, like you did with the knit stitch.
Step 4. Pull the yarn through the stitch on the populated needle.
Step 5. Slip the stitch from the populated needle off of the populated needle and drop it. Now you have a stitch on the empty needle.
Repeat these steps until all of your stitches are on the needle that was initially empty.
Turn your work and switch the needles like you did with the knit stitch. The needle with the stitches will now be in your left hand and the empty one will be in your right hand. Repeat until you feel comfortable with the purl stitch.
One thing to keep in mind. If you purl every row, you will end up with the garter stitch. If you alternate knit rows and purl rows you'll end up with the stockinette stitch.
Here is the video:
Here is a step by step guide to the purl stitch. The video is below. As with the knit stitch, you'll need a cast on row or a row of knit and/or purls. When referring to the needle with all of the stitches already on it, I'll call it the populated needle and the other needle will be referred to as the empty needle.
Step 1. Hold the needles with your cast on/knitted/purled stitches from your previous row in your left hand. The empty needle on your right hand.
Step 2. Stick the empty needle through the front of the stitch closest to the pointy end of the populated needle.
Step 3. Wrap the yarn around the empty needle, like you did with the knit stitch.
Step 4. Pull the yarn through the stitch on the populated needle.
Step 5. Slip the stitch from the populated needle off of the populated needle and drop it. Now you have a stitch on the empty needle.
Repeat these steps until all of your stitches are on the needle that was initially empty.
Turn your work and switch the needles like you did with the knit stitch. The needle with the stitches will now be in your left hand and the empty one will be in your right hand. Repeat until you feel comfortable with the purl stitch.
One thing to keep in mind. If you purl every row, you will end up with the garter stitch. If you alternate knit rows and purl rows you'll end up with the stockinette stitch.
Here is the video:
Tuesday, June 17, 2008
The Eastern European Method and another baby blanket
There are numerous ways to knit. The most important thing is to try to find the way that is the most comfortable for you. The cast on in my first tutorial isn't the cast on that all knitters use. I'm sure there are many knitter out there who don't like the cast on I gave instructions on. And the method I use for the knit and purl stitches isn't the same as the stitches that a lot of people in America use. There is a lot of talk about the Continental and English methods. One hold the yarn in tension and the other throws the yarn. I really wondered which kind I used, and last night I realized I don't knit either of these.
Learn How to Knit in the Eastern European Method:
Knit Cast On
The Knit Stitch
The Purl Stitch
Increases: The Yarn Over
The Eastern Cast On - Good for Toe Up Socks
I have some pictures of a baby blanket I made for my cousin's baby. I would like to thank my cousin for the pictures, I think they came out well. I had almost forgotten how pretty th e blanket is.

Learn How to Knit in the Eastern European Method:
Knit Cast On
The Knit Stitch
The Purl Stitch
Increases: The Yarn Over
The Eastern Cast On - Good for Toe Up Socks
Patrick helped me come to this realization. He said I should put my knitting tutorials on You Tube. That I would get a lot more people seeing them if there were accessable from You Tube. Then he did a search for Knitting and came up with a video that had been seen many many many times. The video showed and talked about the difference between the Continental and the English methods. I watched for a little while and realized I don't knit either of those ways. At this point, I came to the conclusion that I have been knitting some weird way for years and I just showed a tutorial of this for all the world to see. I was sort of embarrassed. Then I looked into it and realized that the way I knit is called the Eastern European Method. It wasn't some really strange way of knitting, just a different method. The Eastern Method looks very similar to the English and continental stitches. They do sit on the needles differnently, but all of these ways produce a fabric/garment and isn't that the point? Knitting is a hobby for most. There are those who can make a living by knitting, designing knitwear or writing about knitting, but most knitters are knitting to relieve stress, to make things or to help pass time while waiting for other things.
I have some pictures of a baby blanket I made for my cousin's baby. I would like to thank my cousin for the pictures, I think they came out well. I had almost forgotten how pretty th
 e blanket is.
Thursday, June 12, 2008
The Knit Stitch
As I mentioned in my first entry, the first thing my Grandma told me about knitting is that there are only two stitches, the knit and purl. Then she explained that the knit and purl stitch are the two sides of the same stitch. The pictures below show two sides of the same swatch.
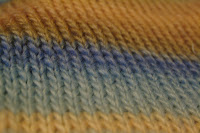

As you can see, the knit stitch looks like a bunch of little V's and the purl stitch looks like a bunch of -'s put together. I'm sure most of you have seen this when looking at sweaters.
We will build on our cast on row from the last tutorial. If you would like to try it at home, cast on ten stitches. Remember that the slip knot counts as one stitch. Honestly it doesn't matter how many stitches you cast on, ten just seemed like a good number. Below, the knit stitch is written out step by step and there is also a video that demonstrates how I do the knit stitch.


As you can see, the knit stitch looks like a bunch of little V's and the purl stitch looks like a bunch of -'s put together. I'm sure most of you have seen this when looking at sweaters.
We will build on our cast on row from the last tutorial. If you would like to try it at home, cast on ten stitches. Remember that the slip knot counts as one stitch. Honestly it doesn't matter how many stitches you cast on, ten just seemed like a good number. Below, the knit stitch is written out step by step and there is also a video that demonstrates how I do the knit stitch.
- Take the needle with the casted on stitches in your left hand and the empty needle in your right hand.
- Take the needle in your right hand and stick it into the back of the loop of the first stitch (The last stitch you casted on, it is the closest stitch to the needle's point.)
- Place the yarn that is connected to your unused yarn on top of the the part of the right needle that is sticking out of the cast on stitch so that the yarn is just covering the top half of the needle's circumference.
- Pull the right needle through the cast on stitch that you stuck it through in the second step pulling the yarn with it.
- Slide the cast on stitch off of the left needle.
- Now you have one stitch on the right needle and nine stitches on the left needle.
- Repeat steps one through five until the end of the row.
- After you have completed one row, your right needle has all of the stitches on it and your left needle is empty.
- Turn your work. This means that you take the needle in your right hand that has all of the stitches on it and turn it around so that the yarn that is connected to the ball is on the right side of the stitches. Now the empty needle will be in your right hand again.
- Repeating these steps will not yield a piece of fabric that looks like the ones in the pictures above. It will produce a fabric that looks like this:
- It is called the garter stitch. When you knit something (that isn't knit in the round, we'll talk about this later for those of you who don't know what I'm talking about.) you create the garter stitch. It looks like all purls usually, but the only stitch that is made is the knit stitch. It looks like this because even though you are only using the knit stitch, every time you knit on the other side, you are actually creating purls. Remember that part about only two stitches and the purl is the back of the knit stitch. This is where that comes in to play.
Here's a video I put together, hopefully it will help everyone who learns better from seeing an example than reading instructions.
I hope that helped. If you have any questions, comments, or suggestions for making this tutorial better or more user friendly, feel free to contact me at KnittingKel@gmail.com.
Tuesday, June 10, 2008
Casting On
Let's start at the beginning, just about anything that is knit starts out with a step called casting on. There are many ways to cast on. I'll show and explain how to cast on today. When I do a tutorial, I really want everyone to be able to learn in the best way possible. Because everyone is different, I am going to include two different methods of teaching. The first will be written instructions and the second will be a video. I learn best from watching examples, but I know that some people also learn when they can read words that explain the process, and others like a combination of both.
My favorite method of casting on is very similar to the knit stitch. The first step is to take your yarn and form a slip knot. If you already know how to make a slip knot, you can skip the next paragraph.
This is done by holding the end of the yarn with one hand and with your other hand, place two fingers on the yarn a little closer to your ball of yarn. Make a loop with the yarn over your two fingers and with your other hand bring the end of the yarn up between your fingers, between the loop. Pull it tight and now you have a slip knot! It's called a slip knot because if you pull on the yarn, the knot travels up and down. If you pull hard enough, the knot will come out completely.
Take the loop formed by the slip knot and place it on your needle. Pull the tails of the yarn so that the loop fits snugly around the needle, but not too tight that you can't move the yarn on the needle. Take your other needle and stick it through the slip knot. Loop your yarn that is attached to the rest of the yarn, not the little tail on the other side of the slip knot, around your needle. Pull the needle through the slip knot loop and place your new loop onto the needle with the slip knot loop. Now, you have two stitches on your needle. Repeat this until you are comfortable with it. Now you know what to do when a pattern says cast on (CO) and number of stitches.
Here's the video.
I hope this was helpful. If you have any questions, comments or suggestions, just leave a comment below, or email me at KnittingKel@gmail.com. Thanks!
My favorite method of casting on is very similar to the knit stitch. The first step is to take your yarn and form a slip knot. If you already know how to make a slip knot, you can skip the next paragraph.
This is done by holding the end of the yarn with one hand and with your other hand, place two fingers on the yarn a little closer to your ball of yarn. Make a loop with the yarn over your two fingers and with your other hand bring the end of the yarn up between your fingers, between the loop. Pull it tight and now you have a slip knot! It's called a slip knot because if you pull on the yarn, the knot travels up and down. If you pull hard enough, the knot will come out completely.
Take the loop formed by the slip knot and place it on your needle. Pull the tails of the yarn so that the loop fits snugly around the needle, but not too tight that you can't move the yarn on the needle. Take your other needle and stick it through the slip knot. Loop your yarn that is attached to the rest of the yarn, not the little tail on the other side of the slip knot, around your needle. Pull the needle through the slip knot loop and place your new loop onto the needle with the slip knot loop. Now, you have two stitches on your needle. Repeat this until you are comfortable with it. Now you know what to do when a pattern says cast on (CO) and number of stitches.
Here's the video.
I hope this was helpful. If you have any questions, comments or suggestions, just leave a comment below, or email me at KnittingKel@gmail.com. Thanks!
Subscribe to:
Posts (Atom)


